From Localhost to a Global Website: Deploy with Codex, GitHub, and Cloudflare
You have built a web application with AI. Everything works at http://localhost:5173 on your computer.
Then you send that address to a friend—and they cannot open it.
The code is not necessarily broken. localhost means “this computer,” so the address exists only in your development environment. For people in Shanghai, Tokyo, London, or New York to visit it, you must deploy the app: hand its production files to an always-online service with a public address.
This tutorial walks through a complete first deployment:
Codex inspects, edits, builds, and verifies; GitHub stores code and records changes; Cloudflare Pages builds, deploys, and serves the site through its global network.
We use a static Vite app as the example. React, Vue, Svelte, and other Vite projects follow almost the same steps. A plain HTML site or Hugo site only needs different build and output settings.
By the end, you will have:
- a GitHub repository;
- a public HTTPS URL such as
https://your-project.pages.dev; - automatic deployment after every relevant push;
- a preview URL for each feature branch or pull request;
- reusable Codex prompts for diagnosing deployment failures.
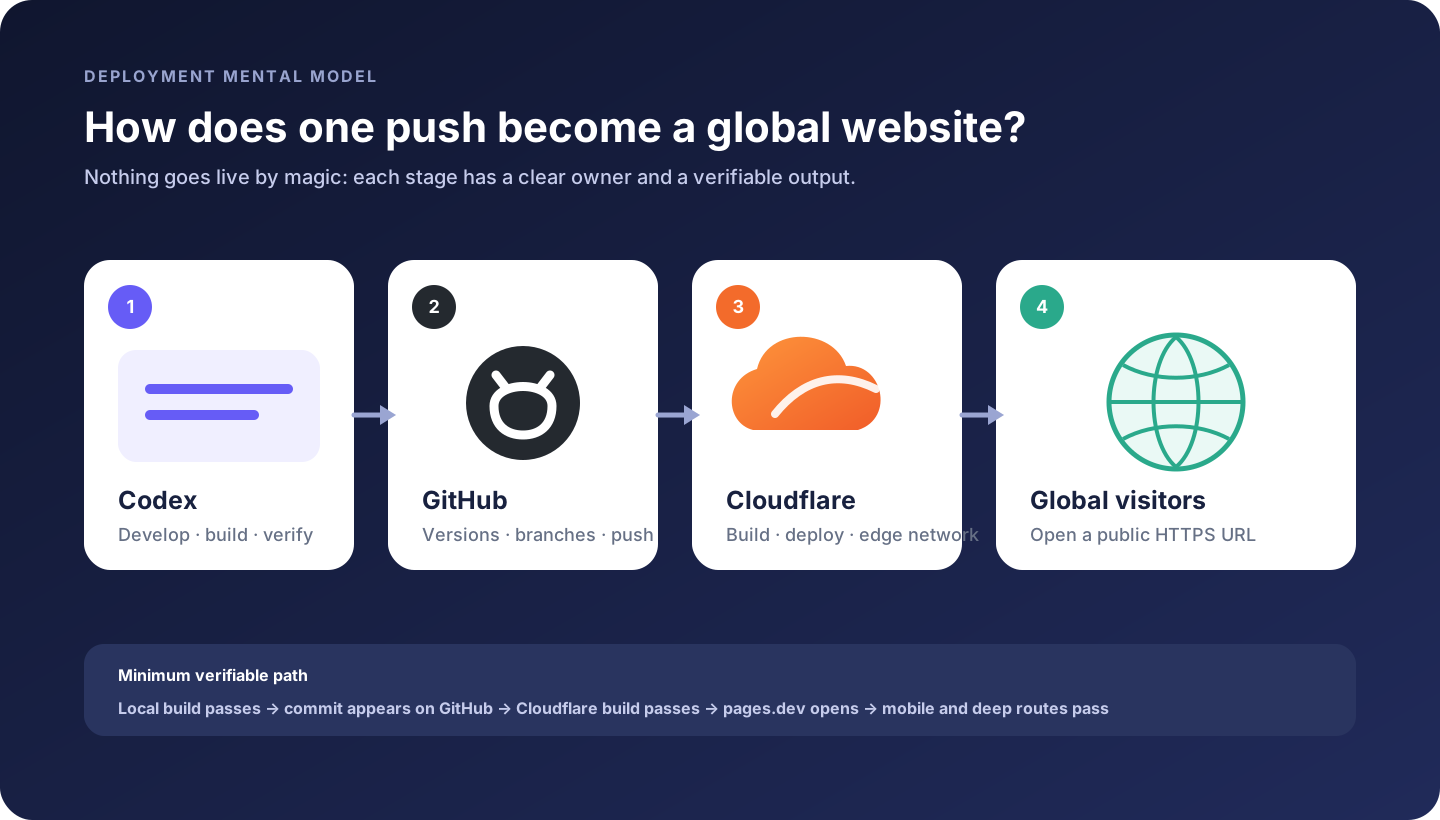
1. Build the right mental model: the three tools do different jobs
Think of deployment as publishing a book:
| Role | Analogy | Responsibility here | Verifiable output |
|---|---|---|---|
| Codex | Editor and quality control | Read the project, edit, build, and test | Source that builds successfully |
| GitHub | Version archive | Store commits, branches, and PRs; notify Cloudflare | Traceable Git history |
| Cloudflare Pages | Printer and distributor | Pull, build, deploy, and serve static assets over HTTPS | A globally reachable URL |
A common misconception is: “Once I install the GitHub and Cloudflare plugins, Codex can automatically publish everything.”
In reality, a plugin is not account permission. OpenAI explains that plugins can bundle skills, connectors, and MCP tools, while external services still require their own connection and authorization. The GitHub plugin helps Codex follow safe repository and PR workflows. The Cloudflare plugin gives Codex current, platform-specific guidance for Pages, Workers, and Wrangler. GitHub and Cloudflare authentication and access controls still govern every external write.
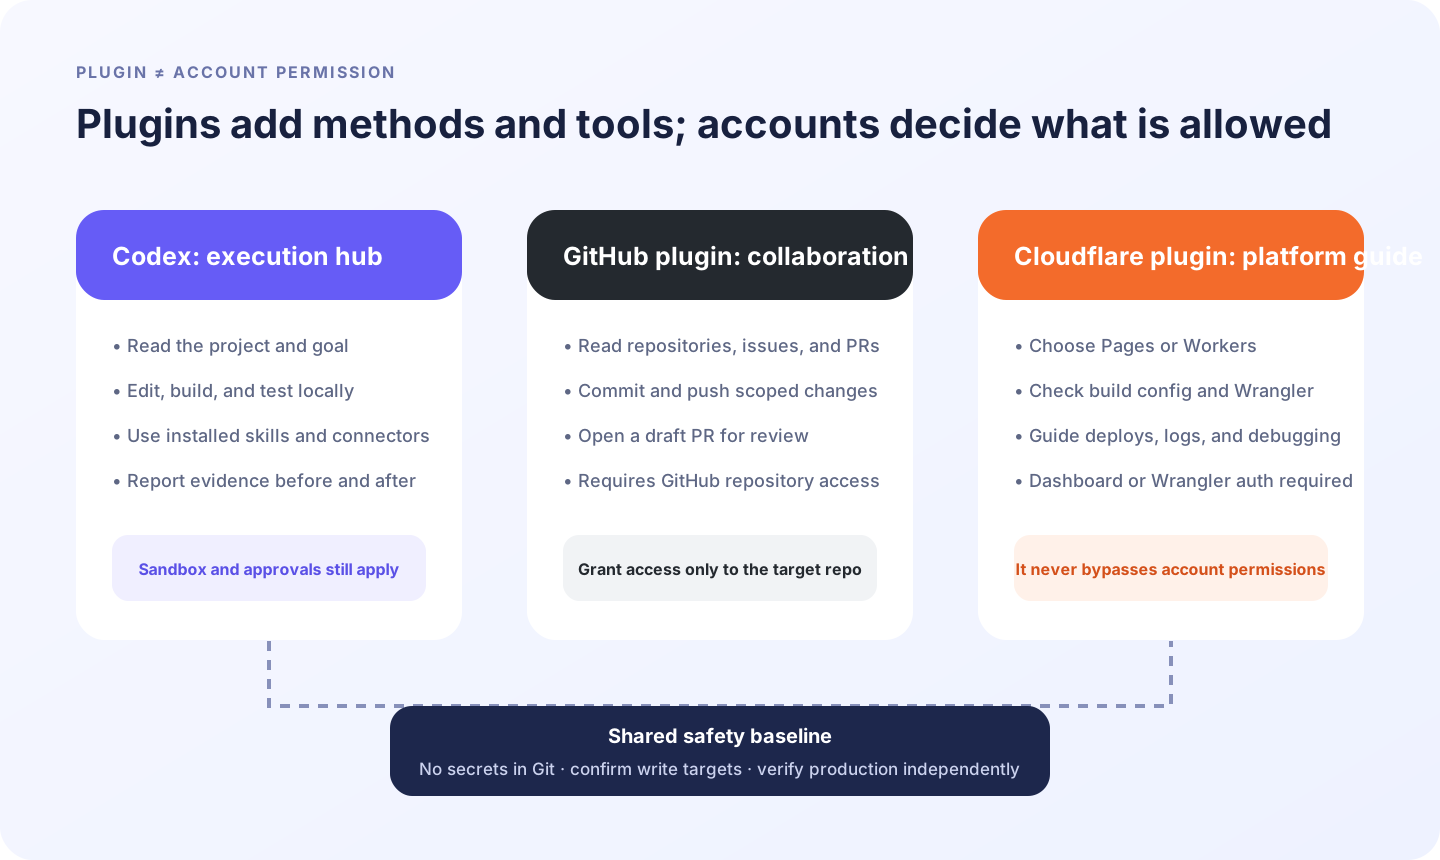
That boundary is a safety belt. Misunderstanding a request should not automatically grant an AI access to every repository and production environment you own.
2. Why Pages here—and when do you need Workers?
Cloudflare offers many products, which can be confusing on a first deployment.
Start with the output of npm run build:
- If it creates
dist/,build/, orpublic/containing HTML, CSS, JavaScript, and images, prefer Cloudflare Pages. - If the application must execute server-side code, query a database, protect API secrets, or implement backend endpoints, evaluate Pages Functions or Cloudflare Workers.
- If it requires a persistent process, local disk, or specific server software, do not assume Pages can run it. Evaluate the runtime first.
We choose Pages because the first deployment becomes a simple, observable path:
GitHub branch → Cloudflare pulls code → runs the build → publishes output → HTTPS URLCloudflare officially supports connecting a Pages project to GitHub or GitLab. A push can trigger deployment, while branches and pull requests can receive separate preview URLs.
3. Prerequisites: four things are enough
You need:
- The ChatGPT desktop app, signed in and switched to Codex, with your project folder open.
- A GitHub account.
- A Cloudflare account.
- A project that starts locally and displays a page.
Also recommended:
- a current Node.js LTS release;
- Git;
- GitHub CLI
ghif you want the command-line path; - a
package.jsonat the project root.
Install the GitHub and Cloudflare plugins
Open Plugins from Codex in the ChatGPT desktop app:
- Find and install the GitHub plugin.
- Find and install the Cloudflare plugin.
- Connect GitHub when prompted.
- Prefer access to selected repositories only.
- Start a new Codex task so the installed skills and tools are loaded.
In Codex CLI, run /plugins to open the plugin browser and start a new session after installation.
The Cloudflare plugin primarily supplies Cloudflare-aware workflows and current platform rules. Cloudflare Dashboard or Wrangler authentication remains the account channel that authorizes a deployment.
4. Step 1: ask Codex for a deployment readiness report
Do not begin with “deploy this.” Ask Codex to inspect first and report facts without editing:
Inspect the current web project for Cloudflare Pages deployment readiness.
Do not modify files yet.

Report:
1. framework and package manager;
2. local dev command and production build command;
3. build output directory;
4. server runtime, database, or secret environment-variable dependencies;
5. files that must not be committed to GitHub;
6. blockers that must be fixed before deployment;
7. a recommendation among Pages, Workers, or another platform, with reasons.
A useful answer looks like this:
Framework: React + Vite
Package manager: npm (package-lock.json exists)
Build: npm run build
Output: dist
Server dependencies: none
Secret variables: none
Recommendation: Cloudflare Pages with Git integration
If Codex is uncertain, ask for the exact files and lines supporting each conclusion. Do not let it infer the architecture from the project name.
5. Step 2: make the production build pass locally
A working development server does not prove that the production build works. Development mode may tolerate warnings, rely on a local proxy, or hide case-sensitive path mistakes.
From the project root:
npm install
npm run build
A Vite project usually creates dist/. Then run:
npm run previewOpen the preview URL and check:
- the homepage loads;
- CSS, fonts, and images load;
- primary buttons work;
- a refresh still works;
- the browser console has no blocking errors;
- the layout does not overflow at mobile width.
Codex can execute this, but give it explicit acceptance criteria:
Install dependencies and run the production build. If it fails, explain the
root cause before fixing it; do not remove features to bypass the error.
When the build passes, start the production preview and check the homepage,
assets, primary interactions, and browser console. Report commands, output
directory, evidence, and risks that remain untested.
Record the runtime version
“It builds on my machine but not on Cloudflare” often means the Node.js versions differ. Consider declaring a supported range:
{
  "engines": {
    "node": ">=20 <23"
  }
}
You can also add .node-version or .nvmrc. Do not copy a version blindly—ask Codex to reconcile project dependencies with a locally verified version. Cloudflare Pages supports selecting tool versions through project files or build environment variables.
6. Step 3: scan for secrets before pushing
GitHub explicitly warns against committing or pushing passwords, API keys, and other sensitive information.
Your .gitignore should at least cover:
node_modules/
dist/
.env
.env.*
!.env.example
.DS_Store
Ask Codex for a read-only check:
Inspect git status, .gitignore, and the pending diff for API keys, tokens,
passwords, private keys, database URLs, and real .env files. Report only; do
not commit or push. If you find a suspected secret, identify its location and
safe replacement without printing the complete value in your response.
Remember two rules:
- Variables prefixed with
VITE_are compiled into browser assets and cannot hide secrets. - If a secret has reached a remote repository, deleting the file is insufficient. Revoke and rotate the secret immediately.
A static app may contain a public API URL or public analytics ID. Database passwords, payment private keys, and Cloudflare API tokens belong in server-side or platform secret storage.
7. Step 4: publish the local project to GitHub
Recommended: use the GitHub plugin workflow
If the project already has a GitHub remote, ask Codex:
Use the GitHub plugin to publish this web project.

Requirements:
1. inspect git status and the diff; do not include unrelated files;
2. continue only after the build passes;
3. if on main, create feature/first-cloudflare-deploy;
4. stage only deployment-readiness files;
5. commit as: chore: prepare Cloudflare Pages deployment;
6. push the branch and open a draft PR;
7. report the branch, commit, PR URL, and validation evidence.
Why a draft PR instead of pushing every change directly to main? A PR creates a review surface, and after Cloudflare is connected, it can also receive an isolated preview URL.
The GitHub plugin’s publish workflow confirms scope before using local Git for branch creation, staging, commit, and push, then prefers the GitHub connector for creating the draft PR. This reduces the risk of silently publishing unrelated working-tree changes.
Fallback: command-line publishing
If the folder is not yet a Git repository:
git init -b main
git add .
git commit -m "Initial commit"
Create an empty repository on GitHub. Avoid initializing it with a README, license, or .gitignore, which can create conflicting history. Then:
git remote add origin https://github.com/YOUR_NAME/YOUR_REPO.git
git remote -v
git push -u origin main
Or use GitHub CLI:
gh auth status
gh repo create --source=. --private --remote=origin --push
For a first exercise, a private repository is fine. A Cloudflare Git integration can read an authorized private repository, while the deployed website can still be public. Repository visibility and website visibility are separate controls.
8. Step 5: connect GitHub to Cloudflare Pages
Open the Cloudflare Dashboard:
- Go to Workers & Pages.
- Create an application, then choose Pages and Connect to Git.
- Connect GitHub. The first connection asks you to install and authorize the Cloudflare Workers & Pages GitHub App.
- Grant it access only to the repository being deployed.
- Select the repository and production branch, usually
main. - Enter build settings.
- Save and deploy.
Typical Vite build settings
| Setting | Value |
|---|---|
| Framework preset | Vite, if detected correctly |
| Production branch | main |
| Build command | npm run build |
| Build output directory | dist |
| Root directory | /, unless the app is in a monorepo subdirectory |
Cloudflare’s build configuration lists npm run build and dist as the typical React (Vite) combination. Your locally observed output remains the source of truth.
Other common projects:
| Project type | Common build command | Common output |
|---|---|---|
| Plain HTML/CSS/JS | blank | directory containing index.html |
| Vite | npm run build | dist |
| Create React App | npm run build | build |
| Hugo | hugo | public |
For an app under apps/web/, set Root directory to that folder. Otherwise Cloudflare looks for package.json in the wrong place.
What should you read in the first build log?
Do not stare only at the final red line. Check in order:
- repository, branch, and commit being cloned;
- working directory;
- Node.js and package-manager versions;
- dependency installation;
- build command;
- existence of the output directory;
- final deployment URL.
A successful build gives you:
https://your-project.pages.devThis is already a public HTTPS website. Open it from a phone or another computer without connecting to your local network.
9. Step 6: “Success” is not product acceptance
A green pipeline proves that the pipeline finished, not that the product works.
Verify the production URL independently:
[ ] Opens in a private/incognito window
[ ] Homepage returns HTTP 200
[ ] CSS, images, and fonts have no 404s
[ ] Primary buttons and forms work
[ ] Mobile layout is usable
[ ] Direct navigation to /about or /dashboard works
[ ] Refreshing a deep route still works
[ ] Console has no blocking errors
[ ] Network has no failed API or asset requests
[ ] No test data, secrets, or debug output is exposed
Codex can perform browser checks when you provide the URL and criteria:
Perform a read-only production acceptance check on this Cloudflare Pages URL:
<URL>. Test desktop and mobile viewports, homepage and deep-route refresh,
primary interactions, Console, and Network. Report Pass / Fail / Not covered
with evidence, and distinguish code defects from deployment configuration.
10. Step 7: make every later change safe to deploy
Cloudflare Pages can automatically build after branch pushes. For pull requests originating in the same repository, Pages creates a unique preview URL that updates with later commits. Commits on main update production.
Use this loop for every feature:
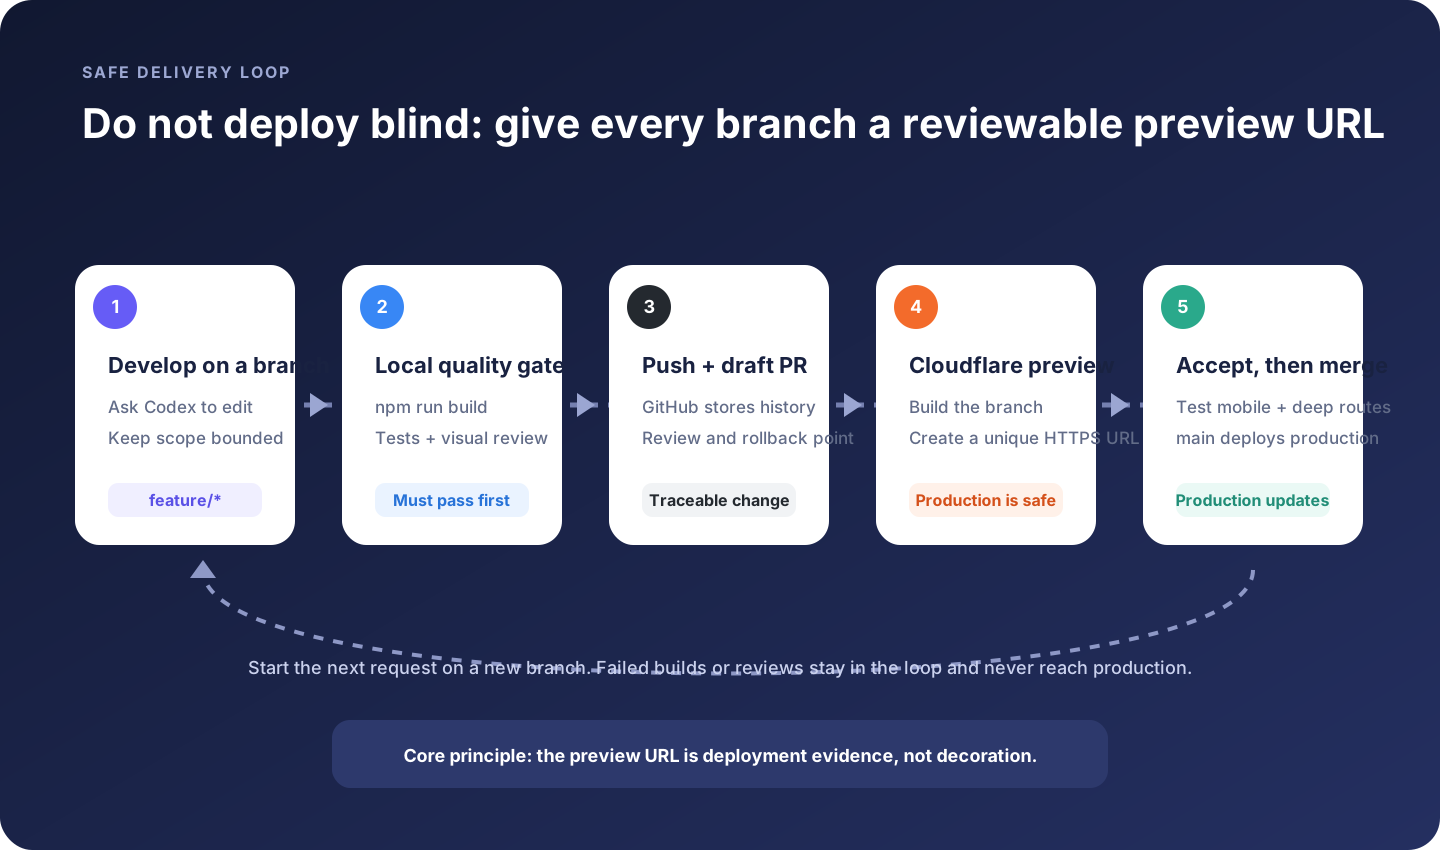
Create a feature branch
  ↓
Ask Codex to implement and build locally
  ↓
Push and open a draft PR
  ↓
Accept the Cloudflare preview URL
  ↓
Merge into main
  ↓
Cloudflare updates production automatically
This is safer than uploading a new archive after every edit. Source versions, deployment records, and live results can be traced to one another, making rollback and diagnosis practical.
Pages preview deployments are public by default. Use Cloudflare Access when previews contain unreleased features or internal data. An unguessable-looking URL is not authorization.
11. Optional: deploy directly with Wrangler
For a temporary demo or deployment from your own CI, use Cloudflare’s official CLI, Wrangler:
npm install -D wrangler@latest
npx wrangler --version
npx wrangler login
npx wrangler whoami
npx wrangler pages project create my-first-site
npm run build
npx wrangler pages deploy ./dist --project-name my-first-site
This path is easy to automate, but beginners may conflate local build success with correct production configuration. Git integration is the recommended first path because commits, previews, and production naturally form one feedback loop.
Your initial choice between Git integration and Direct Upload also affects the project workflow. Cloudflare documents that a Git-integrated project cannot later be converted into a Direct Upload project. You can disable automatic deployments and use Wrangler against an existing project, but decide the primary workflow before creating the project.
12. Add your own domain
The pages.dev address already works globally. When you own a domain:
- Open the Pages project.
- Select Custom domains.
- Choose Set up a domain.
- Enter
www.example.comorexample.com. - Follow the DNS steps and wait for certificate activation.
Cloudflare’s rules are:
- an apex domain such as
example.commust be a Cloudflare zone with nameservers pointing to Cloudflare; - a subdomain such as
www.example.comcan use a CNAME to<project>.pages.dev; - do not manually add only a CNAME while skipping the Pages “add custom domain” flow, or the domain may fail to resolve correctly.
Verify both endpoints:
curl -I https://example.com
curl -I https://your-project.pages.dev
Confirm HTTPS and decide whether the pages.dev address should redirect to the primary domain.
13. Six common failures, diagnosed by layer
1. Cloudflare cannot see the repository
Check whether the Cloudflare Workers & Pages GitHub App is installed for the right account or organization, whether repository access includes the target, whether you may install apps for that organization, and whether the repository was moved or renamed.
This is an authorization-layer problem. Editing code will not fix it.
2. Dependency installation fails
Check the committed lockfile, package manager, Node.js version, and authentication for any private dependency registry.
3. The build passes but the output directory is missing
Typical causes include the wrong output setting, incorrect monorepo root, a framework that writes to build instead of dist, or a build script gated by a missing environment variable.
Ask Codex to compare the local directory tree with Cloudflare settings. Do not create an empty dist folder to silence the error.
4. The homepage works, but refreshing a nested route returns 404
First identify the architecture:
- a multi-page static site should generate HTML for each path;
- an SPA needs navigation requests to fall back to
index.html.
Cloudflare Pages treats a project without a top-level 404.html as an SPA and applies fallback behavior. When an explicit rule is required, place this in public/_redirects so it reaches the build output:
/* /index.html 200Do not apply it blindly to a true multi-page generator such as Hugo; it can hide missing pages and create duplicate content.
5. The page is blank and assets return 404
An absolute asset path may assume a different base path, or Vite’s base setting may be wrong. Start with the first failed Network request and trace it back to the build setting that generated the URL.
6. The local API works but production fails
Check whether a proxy exists only in the Vite dev server, whether the production API base URL is missing, whether CORS permits the production domain, whether HTTPS is calling an HTTP API, and whether a server secret was accidentally compiled for the browser.
This is usually a runtime-request issue, not a Cloudflare build failure.
14. Four copy-ready Codex prompts
Prompt 1: deployment preparation
Goal: deploy this web project to Cloudflare Pages through GitHub.
First inspect only: framework, package manager, build command, output directory,
runtime dependencies, and secret risks. Propose the smallest change plan and
wait for confirmation. Do not replace the framework, remove features, commit
.env files, or edit unrelated files. Acceptance: production build passes,
output is explicit, and configuration is supported by official documentation.
Prompt 2: GitHub publishing
Use the GitHub plugin to publish these deployment-readiness changes. Inspect
git status and the full diff first. Stop and report if unrelated changes exist.
Create a separate branch, stage only target files, run relevant checks, commit,
push, and open a draft PR. Never force-push, commit secrets, or merge main.
Prompt 3: failed deployment
Here is the Cloudflare Pages build log: <paste or provide the page>.
Classify the failure as clone, install, build, output, deploy, or runtime.
Find the earliest causal error and compare it with package.json, the lockfile,
and local output. Explain the root cause and smallest fix first. Do not skip
tests or swallow errors to make CI green. Re-run the local build after fixing,
then list Cloudflare Dashboard settings that still require manual confirmation.
Prompt 4: production acceptance
Perform a read-only production check on <URL>. Verify HTTP status, assets,
desktop and mobile layout, primary interactions, deep-route refresh, Console,
Network, and sensitive-data exposure. Return a table with check, result,
evidence, severity, and recommended action. Do not modify production settings
without my approval.
15. A deployment checklist you can finish today
Local
- Codex identified the actual framework, build command, and output.
-
npm run buildpasses. - Production preview passes.
- Node.js and package-manager versions are reproducible.
-
.gitignorecovers dependencies, output, and.env. - No secrets appear in the pending diff.
GitHub
- The remote is correct.
- The commit contains only intended changes.
- The branch is pushed.
- The draft PR shows the complete diff.
- The Cloudflare GitHub App has access only where needed.
Cloudflare
- Production branch is correct.
- Root directory is correct.
- Build command matches local.
- Output directory matches actual output.
- The first build log has no hidden warnings.
- The
pages.devURL works from another device and network.
After deployment
- Homepage, assets, interactions, and deep routes pass.
- Console and Network show no critical failures.
- Preview and production URLs are not confused.
- Custom-domain HTTPS works.
- The team knows to start the next deployment from a new branch.
Conclusion: deployment is a repeatable chain of evidence
The most important outcome of a first deployment is not merely a new URL. It is understanding this chain:
A local build proves the source can produce artifacts → a GitHub commit proves the version is traceable → Cloudflare logs prove the delivery ran → production acceptance proves real visitors can use it.
Codex helps you understand the project, execute repeatable steps, analyze evidence, and shorten diagnosis. GitHub and Cloudflare turn one accidental success into a workflow that can be repeated, previewed, reviewed, and rolled back.
Once you can complete this loop, you have moved beyond “AI generated a web page” and delivered software that people can actually use.