Mainstream AI Coding Tools in 2026: Install and Compare Qoder, TRAE, CodeBuddy, Cursor, Claude Code, and Codex
Open any AI developer community and a beginner can quickly collect a dozen product names. One person recommends Cursor, another says Claude Code is the real thing, and someone else tells you to try Qoder, TRAE, or CodeBuddy because sign-in and network access are easier in China.
The predictable result is an evening spent installing tools, importing the same repository three times, and still not knowing which one to keep.
This guide has a narrower goal: help you install one useful tool and understand the product map well enough that the next launch announcement does not reset your knowledge.
We will focus on six representative products:
- China-oriented: Alibaba Cloud Qoder, ByteDance TRAE, and Tencent CodeBuddy.
- Global: Cursor, Claude Code, and OpenAI Codex.
GitHub Copilot, Google Antigravity, and Devin Desktop will also appear, but they are not the main installation exercise. This is not a permanent ranking. It is a practical snapshot as of August 2026, based on product forms, official documentation, and the workflows a beginner can actually experience.
1. First distinguish the three ways people work with AI Coding
Mainstream products increasingly cover three working styles. They are not three generations where one replaces another; they are three different ways for a person to observe and control the same development loop.
Visual editor: you still work directly with the code
This is the traditional IDE experience upgraded with AI. You can browse files, manually read and edit code, accept autocomplete, use inline editing, inspect diffs, open a terminal, and preview the application. The Agent works beside you, but the editor remains the center of attention.
Cursor, Qoder Editor, TRAE IDE, CodeBuddy IDE, and Devin Desktop all provide this kind of workbench.
Terminal + Git: you direct the Agent through text and evidence
The project stays local and the main interface is a shell. You describe a task, watch commands and logs, and use Git status, diffs, tests, and commits to judge the result. This style is compact and composable, but it assumes you are comfortable reading command output.
Claude Code, Codex CLI, Cursor CLI, and CodeBuddy Code are representative examples.
Conversational autonomous Agent: you state the outcome, then supervise
Here the conversation is the primary interface. You open a folder or project, describe the result, and the Agent autonomously plans and calls the tools available within the permissions you grant. Those tools may include the local shell, files, Git, a browser, desktop applications, plugins, skills, and connected services. You can follow the work, answer approval requests, review artifacts, and take over when needed without spending the whole task inside a code editor or terminal.
Codex in the ChatGPT desktop app is a strong example. Qoder Quest, TRAE’s task-oriented modes, Claude Code on the web, Devin, and other delegated surfaces follow related patterns.
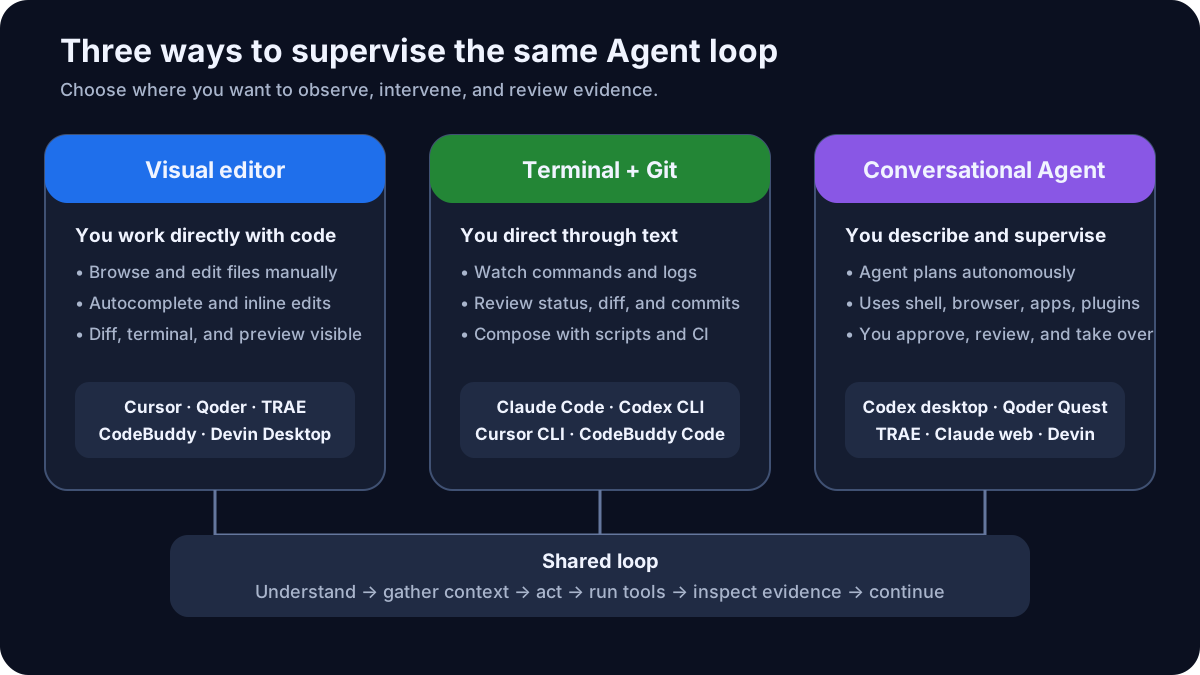
All three styles can run a similar Agent loop:
Understand the goal → collect context → propose or edit → run tools → inspect evidence → continueWhat changes is where you observe the work and when you intervene. When trying any product, check which style it supports best, which files and applications it may access, what requires approval, how it exposes diffs and logs, and whether it can verify the result.
2. The six-tool map in one page
The “best” tool depends first on the work surface you want.
| Tool | Easiest entry point | Main product forms | What a beginner should notice | Good first fit |
|---|---|---|---|---|
| Qoder | Desktop IDE | Editor, Quest, CLI, JetBrains plugin | Quest turns a larger assignment into a visible delegated task | Users wanting a China-oriented IDE plus a clear path to longer agent tasks |
| TRAE | Desktop IDE | IDE Mode, SOLO Mode; TRAE Work as a broader companion product | Strong visual workbench and an agent-oriented product family whose mode names evolve quickly | Beginners who want to build and inspect an application visually |
| CodeBuddy | Desktop IDE or IDE plugin | IDE, plugin, CodeBuddy Code CLI | Ask, Craft, and Plan separate explanation, execution, and planning | Users in the Tencent Cloud ecosystem or teams needing domestic and enterprise sign-in options |
| Cursor | Desktop IDE | Editor, Agent modes, CLI | Familiar VS Code migration plus strong editor-agent integration | Developers who want to keep an editor-centered workflow |
| Claude Code | Terminal | CLI, IDE integration, desktop, web | Terminal-first agent with a broad set of surfaces around the same workflow | Developers already comfortable with shells, Git, and command output |
| Codex | ChatGPT desktop app or CLI | Conversational desktop Agent, CLI, IDE extension, cloud | Can combine local files and shell work with plugins, Computer Use, selectable GPT models, and reasoning controls | Users who want to delegate through conversation while retaining evidence and permission controls |
Do not read this table as six scores. Read it as six different front doors into a largely shared system.
3. China-oriented tools: Qoder, TRAE, and CodeBuddy
This guide groups the following three products by their China-oriented access, account, and deployment options. Their practical advantages may include Chinese interfaces, local payment paths, domestic model options, enterprise deployment, and easier access from Chinese networks. Check the exact edition and data-processing terms before using company code.
Qoder: Editor for visible work, Quest for delegation
Qoder’s official documentation presents two primary workspaces:
- Editor: includes code completion, inline chat, Ask, and Agent-style interaction.
- Quest: a task-oriented window for delegating larger work, following progress, and reviewing artifacts. Its current modes include Agent and specialized Experts.
Qoder also provides a CLI and a JetBrains plugin. That makes its learning path easy to explain: begin in the Editor, delegate a contained task in Quest, and adopt the CLI only when the terminal feels useful rather than intimidating.
Install the IDE
- Open the official Qoder download page.
- Choose your operating system and run the installer.
- Sign in, open a practice repository, and begin in Ask rather than immediately delegating a large Quest.
Optional CLI installation
On macOS or Linux, the official installer is:
curl -fsSL https://qoder.com/install | bashOr use npm with Node.js 20 or later:
npm install -g @qoder-ai/qodercli
qodercli --version
qodercli
On Windows, Qoder documents a PowerShell installer. Copy the current command from the official CLI installation page rather than from a screenshot or repost.
Best first lesson: ask Qoder to explain the project without editing, then give Quest a small task with an observable result, such as changing a page heading and running the existing check command.
TRAE: a visual IDE with rapidly evolving agent modes
TRAE’s current product family distinguishes two related workspaces:
- TRAE IDE: IDE Mode and SOLO Mode for coding work.
- TRAE Work: a broader desktop, web, and mobile workspace with Work and Code modes.
You may still encounter screenshots that use earlier Builder, Coder, or TRAE SOLO labels. The official changelog records their consolidation into Agent and the rename to TRAE Work. In the current product, focus on the durable distinction: a familiar visual coding workbench and a more autonomous, task-oriented surface.
Install TRAE IDE
- Open the official TRAE download page.
- Download the macOS, Windows, or Linux package shown for your system.
- Open a small repository and keep command approvals visible during the first session.
- Start in IDE Mode. Try SOLO Mode only after you can inspect the files and terminal output it changes.
Best first lesson: let the agent create or adjust one visible page, then compare the requested result with the browser and the changed-file list. Do not judge success from a polished preview alone.
CodeBuddy: Ask, Craft, Plan, plus an enterprise-shaped product line
Tencent describes CodeBuddy in three practical forms: a standalone IDE, plugins for existing IDEs, and CodeBuddy Code, its CLI. In the IDE, the current mode distinction is especially beginner-friendly:
- Ask: discusses and explains without modifying the project.
- Craft: acts locally and can make multi-file changes.
- Plan: decomposes a complex task into a task list before execution.
That separation teaches an important habit: not every question should grant edit permission.
Install the IDE or plugin
- Use the download links on the official Tencent CodeBuddy product page or CodeBuddy documentation.
- Choose the standalone IDE if you want a complete visual workspace. Choose the VS Code or JetBrains plugin if you want to keep your current editor.
- Sign in using the site or enterprise option appropriate to your organization.
Optional CLI installation
With Node.js 18.20 or later:
npm install -g @tencent-ai/codebuddy-code
codebuddy --version
codebuddy
The official quick start also lists native beta installers. Because those commands can change, use the current CLI quick start as the source of truth.
Best first lesson: use Ask to identify the likely files, switch to Craft for one bounded change, and use Plan only when the requirement genuinely spans several steps.
4. Global tools: Cursor, Claude Code, and Codex
These three demonstrate different primary strengths: Cursor centers the visual editor, Claude Code centers the terminal, and Codex now makes the conversational desktop Agent a first-class way to develop. Their pricing, models, and limits change quickly, so this section focuses on stable workflow differences instead of numeric scores.
Cursor: the shortest path from VS Code to an AI editor
Cursor explicitly states that it is based on the VS Code codebase and documents importing VS Code extensions, themes, settings, and keybindings. Its current interaction modes include Agent, Ask, Manual, and custom modes, alongside completion and inline editing.
Install Cursor
- Open the official Cursor download page.
- Install the build for macOS, Windows, or Linux.
- Import VS Code settings if that is your current environment.
- Open a practice repository and begin with Ask. Use Agent for the first small edit.
Optional Cursor CLI
On macOS, Linux, or Windows Subsystem for Linux:
curl https://cursor.com/install -fsS | bash
cursor-agent --version
cursor-agent
Best first lesson: compare Ask and Agent on the same request. Ask should explain the approach; Agent should produce a reviewable diff and verification evidence.
Claude Code: terminal-first, no longer terminal-only
Claude Code began as a strongly terminal-centered experience, and its CLI remains the most complete surface in Anthropic’s documentation. It can read a codebase, edit files, run commands, and work with Git. It now also has IDE integrations, a desktop application, and a web experience.
Install the CLI
On macOS, Linux, or WSL:
curl -fsSL https://claude.ai/install.sh | bash
claude
On Windows PowerShell:
irm https://claude.ai/install.ps1 | iex
claude
Anthropic also documents Homebrew and WinGet options. Check the official Claude Code quick start if your environment differs.
Best first lesson: run it inside a small Git repository, ask it to explain the project, then request one change and inspect git diff. A terminal agent becomes much safer when Git gives you a clear before-and-after boundary.
Codex: a conversational desktop Agent, not only a CLI
Codex is available in the ChatGPT desktop app, as well as through CLI, IDE extension, and cloud environments. The desktop experience is an important product surface in its own right: open a folder, describe an outcome in a chat, and let Codex work across the files and tools you authorize. You can keep several chats or projects moving, inspect real outputs, and supervise long-running work from one workspace. See the official desktop app overview.
Its distinctive capability is the combination of reasoning and tool use:
- Local development tools: Codex can read and edit files, use the local shell, run builds and tests, and work with Git inside the selected project.
- Computer Use: after installing the plugin and granting the required operating-system permissions, Codex can see and operate supported desktop interfaces. This makes it possible to start an application, click through a real user flow, reproduce a UI-only bug, and verify the fix in the interface—not only in test output. Computer Use can affect state outside the repository, so keep the target apps and task scope explicit.
- Plugins, skills, and connected tools: plugins can bundle repeatable Skills, connectors, MCP servers, browser capabilities, and hooks. For example, a development task can combine repository work with GitHub context, browser QA, design files, or another authorized service without pasting everything into one prompt.
- GPT models and reasoning controls: the desktop composer lets you choose an available model and adjust reasoning effort. Higher effort can help with complex diagnosis and planning, while taking longer and using more tokens. This is useful when the hard part is understanding a multi-layer failure rather than typing code quickly.
That produces a third workflow beyond “edit code manually” and “operate through a terminal”:
Describe the result in chat
→ Codex inspects the project and plans
→ it calls shell, browser, apps, and plugins as authorized
→ it changes and tests the code
→ you review the diff, tool evidence, and visible result
Install the desktop app first
- Open the official ChatGPT desktop app page and install the app for your operating system.
- Sign in, choose Codex, and open a disposable practice folder.
- Keep approvals visible. Add Computer Use or another plugin only when the task needs that capability.
- Choose the default model and reasoning effort first; increase reasoning for a genuinely complex investigation.
Optional: install the CLI
On macOS or Linux:
curl -fsSL https://chatgpt.com/codex/install.sh | sh
codex
Then sign in when prompted. Use the Codex IDE extension when you want Codex beside a traditional editor, and use cloud environments when a repository task should run in isolation or in parallel.
Best first lesson: open a small web project in the desktop app and ask Codex to change one visible element. Let it start the app, then use Computer Use to inspect the page and verify the change. Review the file diff, commands, test output, and final UI before accepting the result.
5. Three other common choices: Copilot, Antigravity, and Devin Desktop
These products enter AI Coding from different ecosystems, but they are moving toward the same combination of editing, agent execution, and task delegation.
- GitHub Copilot has a major distribution advantage: it is deeply integrated with GitHub and editors such as VS Code and JetBrains. It now extends beyond completion into agent workflows and additional app or cloud surfaces. It is a strong candidate when a team already standardizes on GitHub and Microsoft tooling.
- Google Antigravity is an agentic development platform with editor, terminal, and browser capabilities. Its editor and agent-first surfaces again show the same shift from suggesting code to executing a development loop.
- Devin Desktop combines a full IDE with an Agent Command Center for local and cloud agents. The same product family also includes Devin’s cloud software-engineering agent and Devin CLI.
For a beginner, the useful question remains the same: do you want to edit beside one local agent, or coordinate several local and cloud tasks from one workspace?
6. For a large project, judge the model—not only the interface
On a small exercise, several tools may all produce a convincing result. The difference becomes easier to see when the task spans a large repository, requires architectural judgment, touches many files, or must survive a long sequence of investigation, implementation, testing, and correction. At that point, autocomplete speed and interface polish are no longer enough. The underlying model must retain intent, reason across layers, use tools reliably, notice contradictions, and recover when the first approach fails.
This gives Codex and Claude Code an important structural advantage. Codex is developed alongside OpenAI’s GPT coding models, while Claude Code is developed alongside Anthropic’s Claude models. OpenAI’s official model documentation describes its Codex model line as optimized for long-horizon agentic coding in Codex-like environments. Anthropic likewise controls both the Claude model family and Claude Code, exposes model and reasoning choices directly in the product, and publishes privacy-preserving analysis of real Claude Code sessions. Together, those conditions create the opportunity for a vertically integrated feedback loop rather than a tool merely calling a model API:
Real coding tasks
→ expose failures in reasoning, tool use, and long-running work
→ improve the model, evaluations, prompts, and Agent loop
→ the stronger model makes the coding product more capable
→ more real tasks produce the next round of feedback
The official GPT-5.3-Codex model page records this optimization for Agent work. Current Claude Code documentation treats model and reasoning effort as first-class choices for different task difficulty levels in its model configuration guide, while Anthropic’s June 2026 research shows how it studies hundreds of thousands of real Claude Code sessions. The broader feedback-loop advantage is therefore an engineering inference from shared ownership and observable research capability—not a claim that every user session is automatically used to train a model.
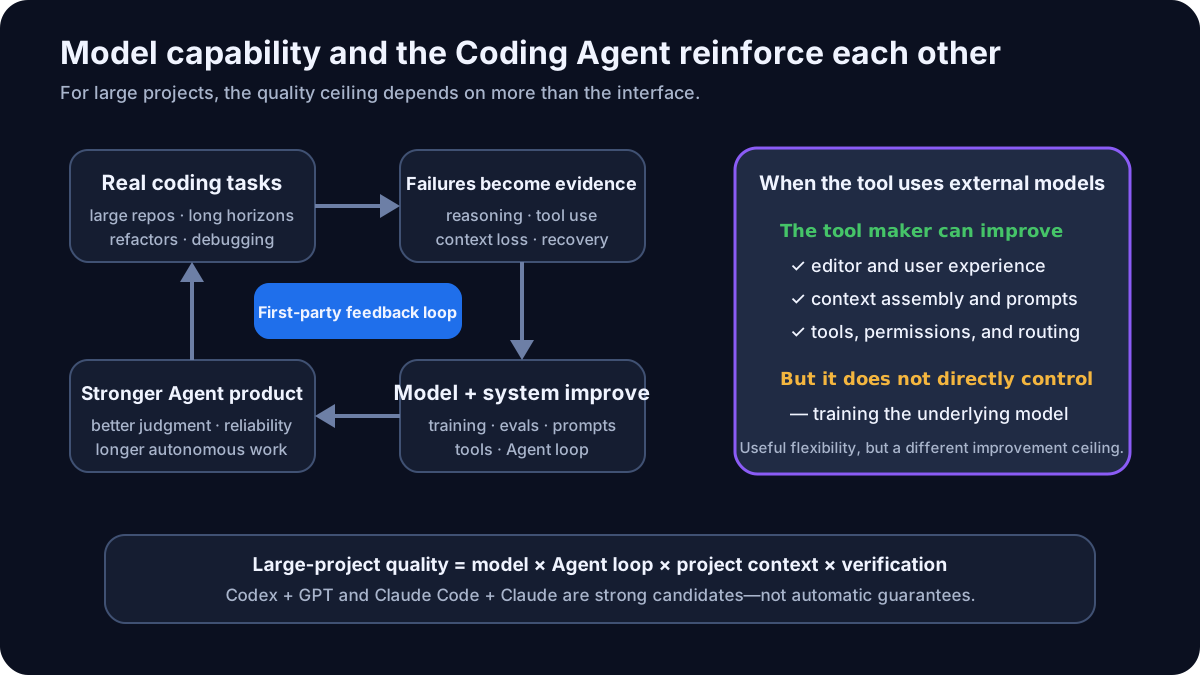
This does not mean an editor that connects to external models has no value. Such products may offer a better editor, easier domestic access, stronger enterprise controls, or the freedom to compare several models. For small and medium tasks, those advantages may matter more. The limitation is the ceiling: when the vendor does not control the model, it can optimize context assembly, prompts, tools, and interface, but it cannot directly train the model around failures discovered inside its own Agent.
For large-project selection, use this mental model:
Engineering output quality
= model capability × Agent loop × project context × verification
A top model inside a weak Agent can still misuse tools or lose context. A polished Agent around a weaker model can still make poor architectural decisions. Codex and Claude Code are strong candidates for demanding work because they combine frontier first-party model families with Agent products that can evolve alongside them—not because their logos automatically guarantee correct code.
This is also why a vendor’s ability to keep investing matters. AI Coding products evolve unusually quickly. Durable resources can fund model training, inference capacity, experienced researchers and engineers, evaluation infrastructure, enterprise support, and distribution. Those advantages reinforce the model–Agent loop.
For day-to-day selection, this long-term advantage still needs to pass the practical checks you can verify directly:
- reliable access from your network;
- support for your operating system and language stack;
- acceptable data retention and training policies;
- predictable pricing and quota behavior;
- compatibility with team rules and existing IDEs;
- correct code or adequate verification.
A useful formula is:
Practical fit = engineering quality × availability × controllability × cost × team compatibilityIf any factor is close to zero, a fashionable product can still be the wrong choice for you.
7. A beginner’s decision: choose how you want to supervise the work
Do not install all six. Pick a first surface, complete one feedback loop, and compare only when you have evidence.
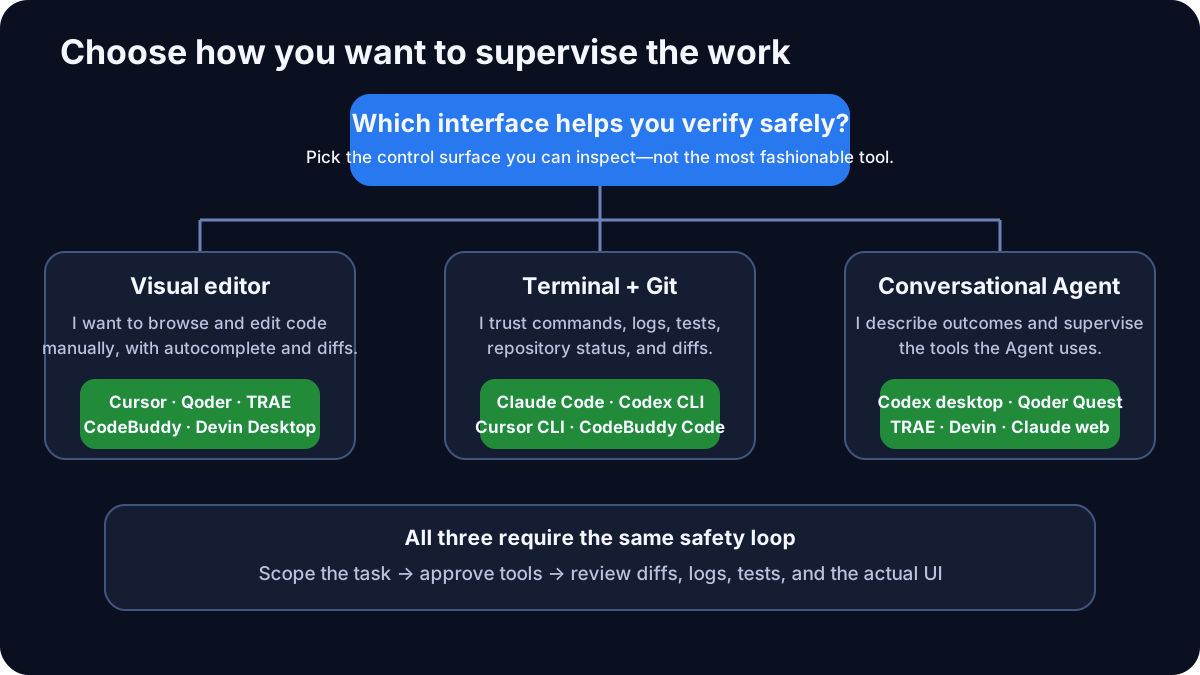
Use these defaults:
- Choose a visual editor when you want to read and modify code manually, accept autocomplete, and keep files, diffs, terminal, and preview visible. Start with Cursor or one of Qoder, TRAE, and CodeBuddy IDEs; Devin Desktop also includes a full IDE.
- Choose terminal + Git when command output, scripts, and repository operations already feel natural. Start with Claude Code, Codex CLI, Cursor CLI, or CodeBuddy Code.
- Choose a conversational autonomous Agent when you prefer to describe the outcome and supervise the Agent as it uses the authorized local environment and tools. Codex in the ChatGPT desktop app is a strong first example; Qoder Quest, TRAE’s task-oriented surfaces, Claude Code web, and Devin provide related delegated workflows.
The third path is not “cloud later.” A desktop Agent can work locally from day one. The important prerequisite is that you can scope the task, understand permission prompts, and review evidence from every tool it used.
If a team wants to compare tools, standardize the task rather than debating impressions. Give every tool the same small repository, requirement, allowed commands, and acceptance checklist. Record:
- time to a usable result;
- files changed outside the requested scope;
- commands and tests actually run;
- number of human corrections;
- total cost or quota consumed;
- whether another teammate can reproduce the result.
This comparison produces evidence that a team can use, instead of relying only on a polished demo.
8. Your first 20-minute installation exercise
Use a disposable practice project, not your employer’s production repository.
Minute 0–5: install and open
Choose one tool from the official links above. Sign in, open the practice repository, and make sure you can see the file list and current Git state.
Minute 5–8: ask without editing
Use Ask or an equivalent read-only instruction:
Read this project without changing files. Tell me:
1. how to start it;
2. which file controls the main page title;
3. which existing command checks that the project still works.
Verify the answer against the repository’s README and configuration files.
Minute 8–15: request one bounded change
Change the main page heading to “My AI Coding Practice”.
Do not add dependencies and do not modify unrelated files.
Run the existing check or build command, then report the changed files and evidence.
Keep approval prompts enabled. Read every command before accepting it.
Minute 15–20: inspect evidence
Check all four:
- The changed-file list contains only expected files.
- The diff matches the requirement.
- The check or build command really ran and exited successfully.
- The application visibly shows the new heading.
If the tool says “done” but cannot show these four pieces of evidence, the task is not done.
9. Installation and security pitfalls
A shell installer is executable code
Commands shaped like curl ... | bash or irm ... | iex download and execute a script. Use only the vendor’s official HTTPS domain, read the current official installation page, and prefer a signed desktop installer or package manager when you are not comfortable inspecting shell scripts.
Do not paste secrets into chat
Do not send .env contents, production credentials, private keys, customer data, or proprietary code until you understand the product edition’s data handling and your organization’s policy. Add sensitive files to the tool’s ignore mechanism where available, but do not treat an ignore file as the only protection.
Keep approvals visible at first
Do not enable blanket permission for commands, network requests, or writes outside the repository during the first week. Increase autonomy only after you understand what the tool executes and how to reverse it.
Use Git as a safety boundary
Begin with a clean working tree. Review git diff after every small task. Commit known-good states. Never let a tool’s friendly summary replace inspection of the actual changes.
Treat mode names as temporary
Product labels change faster than the underlying workflow. If a button mentioned here has moved, look for the current equivalent of Ask, Agent, Plan, delegated task, or CLI in the official documentation.
10. Completion checklist
You are ready for the next beginner article when you can answer “yes” to these questions:
- I installed one AI Coding tool from its official source.
- I can explain whether my tool is editor-first, terminal-first, or delegation-first.
- I know the difference between asking for an explanation and granting edit or command permission.
- I completed one small change and reviewed the actual diff.
- I saw the check, build, or test command run successfully.
- I verified the visible result myself.
- I kept secrets out of the session and understood the product’s account and data boundary well enough for this practice project.
The lasting skill is not memorizing six brands. It is recognizing the shared system, choosing a suitable control surface, and requiring evidence before accepting the result.
Next, use the tool you installed to complete a small runnable application:
Quick Start with AI Coding: Develop a web application in 10 minutes
Authoritative references
Sources were checked on August 18, 2026. Product names, modes, prices, quotas, and installers may change; use the linked official pages as the current source of truth.
- Qoder documentation and product workspaces
- Qoder quick start
- Qoder CLI installation
- Alibaba Cloud documentation: Qoder product forms
- TRAE official download
- TRAE changelog
- TRAE Work announcement
- Tencent CodeBuddy product page
- CodeBuddy IDE overview
- CodeBuddy CLI quick start
- Cursor download and VS Code migration
- Cursor modes
- Cursor CLI installation
- Claude Code overview
- Claude Code quick start
- Claude Code platforms
- Claude Code model configuration
- Anthropic research: how Claude Code is used in practice
- Codex CLI
- Codex IDE extension
- Codex cloud
- ChatGPT desktop app with Codex
- Computer Use in Codex
- Skills and plugins
- Models and reasoning controls
- Use case: QA an app with Computer Use
- OpenAI model documentation: GPT-5.3-Codex for agentic coding
- GitHub Copilot features
- Google Developers Blog: Antigravity agentic development platform
- Devin Desktop official product page